
前言:
项目意义
本项目旨在首先基于核心贡献者的经验,实现国内外主流开源 LLM 的部署、使用与微调教程;在实现主流 LLM 的相关部分之后,我们希望充分聚集共创者,一起丰富这个开源 LLM 的世界,打造更多、更全面特色 LLM 的教程。星火点点,汇聚成海。
DeepSeek-Coder-V2-Lite-Instruct FastApi 部署调用
DeepSeek-Coder-V2-Lite-Instruct是由深度求索(DeepSeek)公司开发并于2024年发布的一款高效开源代码大模型。该模型采用创新的混合专家架构,虽然总参数量为160亿,但每次推理仅激活24亿参数,大幅提升了计算效率并降低了资源消耗。其主要特性包括:支持高达128K的上下文长度,能够处理复杂的代码库和长文档;在代码生成基准测试HumanEval中取得了81.1%的高通过率,性能可与一些700亿参数级别的模型相媲美;同时支持多达338种编程语言,为开发者提供了一个强大且高效的AI编程助手。
环境准备
本文基础环境如下:
----------------
ubuntu 22.04
python 3.12
cuda 12.1
pytorch 2.3.0
----------------
本文默认学习者已安装好以上 Pytorch(cuda) 环境,如未安装请自行安装。
首先 pip 换源加速下载并安装依赖包
# 升级pippython -m pip install --upgrade pip# 更换 pypi 源加速库的安装pip config set global.index-url https://pypi.tuna.tsinghua.edu.cn/simple

pip install fastapi==0.111.1
pip install uvicorn==0.30.3
pip install modelscope==1.16.1
pip install transformers==4.43.2
pip install accelerate==0.32.1
考虑到部分同学配置环境可能会遇到一些问题,我们在AutoDL平台准备了DeepSeek-Coder-V2-Lite-Instruct的环境镜像,点击下方链接并直接创建Autodl示例即可。 https://www.codewithgpu.com/i/datawhalechina/self-llm/Deepseek-coder-v2
模型下载
使用 modelscope 中的 snapshot_download 函数下载模型,第一个参数为模型名称,参数 cache_dir 为自定义的模型下载路径,参数revision为模型仓库分支版本,master 代表主分支,也是一般模型上传的默认分支。
先切换到 autodl-tmp 目录,cd /root/autodl-tmp
然后新建名为 model_download.py 的 python 文件,并在其中输入以下内容并保存
# model_download.pyimport torchfrom modelscope import snapshot_download, AutoModel, AutoTokenizer

model_dir = snapshot_download('deepseek-ai/DeepSeek-Coder-V2-Lite-Instruct', cache_dir='/root/autodl-tmp', revision='master')
然后在终端中输入 python model_download.py 执行下载,注意该模型权重文件比较大,因此这里需要耐心等待一段时间直到模型下载完成。
注意:记得修改
cache_dir为你的模型下载路径哦~
代码准备
在 /root/autodl-tmp 路径下新建 api.py 文件并在其中输入以下内容,粘贴代码后记得保存文件。下面的代码有很详细的注释,大家如有不理解的地方,欢迎提 issue 😊
# api.pyfrom fastapi import FastAPI, Requestfrom transformers import AutoTokenizer, AutoModelForCausalLM, pipelineimport uvicornimport jsonimport datetimeimport torch# 设置设备参数DEVICE = "cuda"  # 使用CUDACUDA_DEVICES = ["0", "1", "2", "3"]  # CUDA设备ID列表,这里假设我们有四张N卡,所以编号分别为0,1,2,3DEVICE_IDS = [f"{DEVICE}:{device_id}" for device_id in CUDA_DEVICES]  # 组合CUDA设备信息# 清理GPU内存函数def torch_gc():    if torch.cuda.is_available():  # 检查是否可用CUDA
        for device_id in DEVICE_IDS:  # 循环每个CUDA设备
            with torch.cuda.device(device_id):  # 指定CUDA设备
                torch.cuda.empty_cache()  # 清空CUDA缓存
                torch.cuda.ipc_collect()  # 收集CUDA内存碎片# 创建FastAPI应用app = FastAPI()# 处理POST请求的端点@app.post("/")async def create_item(request: Request):    global model, tokenizer  # 声明全局变量以便在函数内部使用模型和分词器
    json_post_raw = await request.json()  # 获取POST请求的JSON数据
    json_post = json.dumps(json_post_raw)  # 将JSON数据转换为字符串
    json_post_list = json.loads(json_post)  # 将字符串转换为Python对象
    prompt = json_post_list.get('prompt')  # 获取请求中的提示

    messages = [
            {"role": "system", "content": "You are a helpful assistant."},
            {"role": "user", "content": prompt}
    ]    # 调用模型进行对话生成
    input_ids = tokenizer.apply_chat_template(messages,tokenize=False,add_generation_prompt=True)
    model_inputs = tokenizer([input_ids], return_tensors="pt").to('cuda')
    generated_ids = model.generate(model_inputs.input_ids,max_new_tokens=512)
    generated_ids = [
        output_ids[len(input_ids):] for input_ids, output_ids in zip(model_inputs.input_ids, generated_ids)
    ]
    response = tokenizer.batch_decode(generated_ids, skip_special_tokens=True)[0]
    now = datetime.datetime.now()  # 获取当前时间
    time = now.strftime("%Y-%m-%d %H:%M:%S")  # 格式化时间为字符串
    # 构建响应JSON
    answer = {        "response": response,        "status": 200,        "time": time
    }    # 构建日志信息
    log = "[" + time + "] " + '", prompt:"' + prompt + '", response:"' + repr(response) + '"'
    print(log)  # 打印日志
    torch_gc()  # 执行GPU内存清理
    return answer  # 返回响应# 主函数入口if __name__ == '__main__':    # 加载预训练的分词器和模型
    model_name_or_path = '/root/autodl-tmp/deepseek-ai/DeepSeek-Coder-V2-Lite-Instruct'
    tokenizer = AutoTokenizer.from_pretrained(model_name_or_path, use_fast=False)
    model = AutoModelForCausalLM.from_pretrained(model_name_or_path, device_map="auto", torch_dtype=torch.bfloat16)    # 启动FastAPI应用
    # 用6006端口可以将autodl的端口映射到本地,从而在本地使用api
    uvicorn.run(app, host='0.0.0.0', port=6006, workers=1)  # 在指定端口和主机上启动应用
API 部署
在终端输入以下命令启动 api 服务。
cd /root/autodl-tmp
python api.py
终端出现以下结果表示启用 api 服务成功。

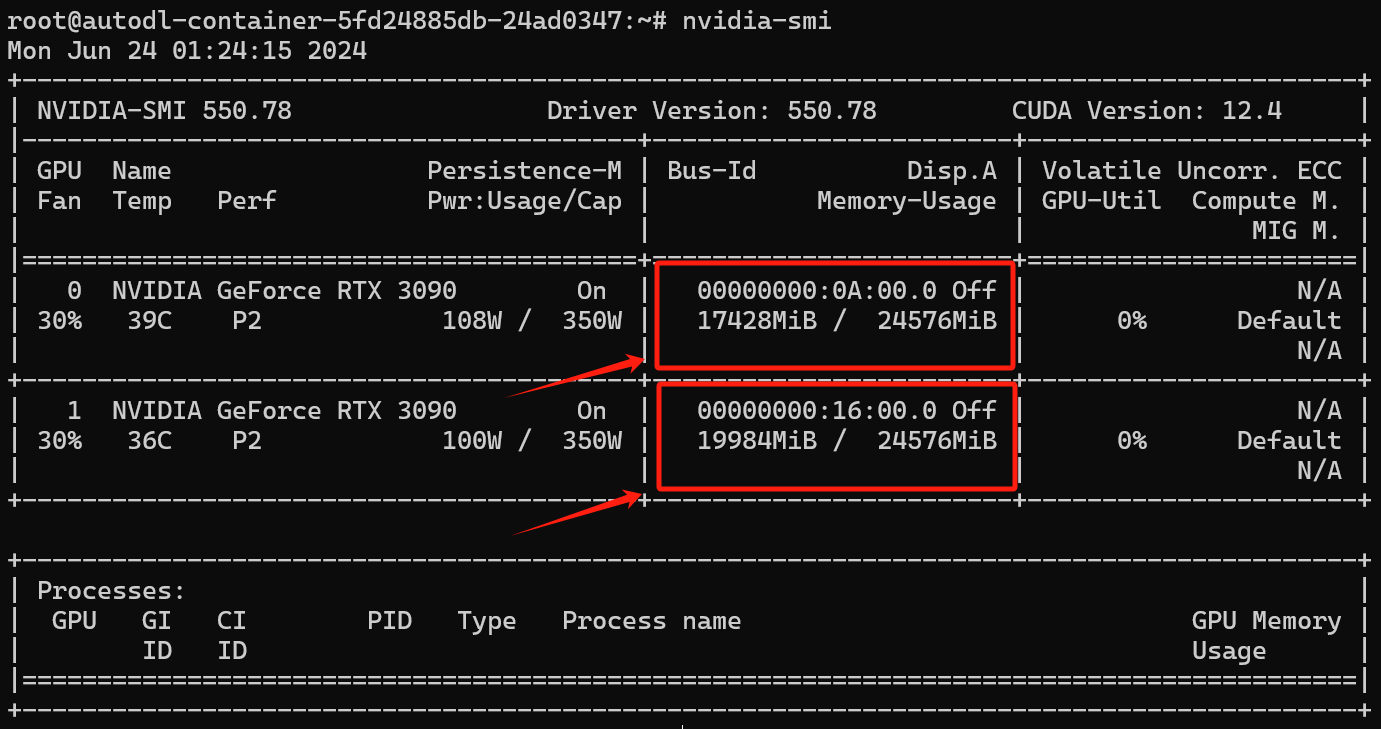
此时我们可以观察一下模型权重加载后显存的占用情况😄
默认部署在 6006 端口,通过 POST 方法进行调用,可以新建一个终端使用 curl 调用,如下所示:
curl -X POST "http://127.0.0.1:6006"
     -H 'Content-Type: application/json'
     -d '{"prompt": "你好", "history": []}'
得到的返回值如下所示:
{
  "response": " 您好!有什么我可以帮助您的吗?无论是日常生活中的问题,还是工作学习上的疑惑,我都在这里尽力为您提供帮助和解答。",
  "history": [
    [
      "你好",
      " 您好!有什么我可以帮助您的吗?无论是日常生活中的问题,还是工作学习上的疑惑,我都在这里尽力为您提供帮助和解答。"
    ]
  ],
  "status": 200,
  "time": "2024-06-23 23:56:27"}
调用示例结果如下图所示:

我们也可以使用 Python 中的 requests 库进行调用,如下所示:
# request.pyimport requestsimport jsondef get_completion(prompt):
headers = {'Content-Type': 'application/json'}
data = {"prompt": prompt, "history": []}
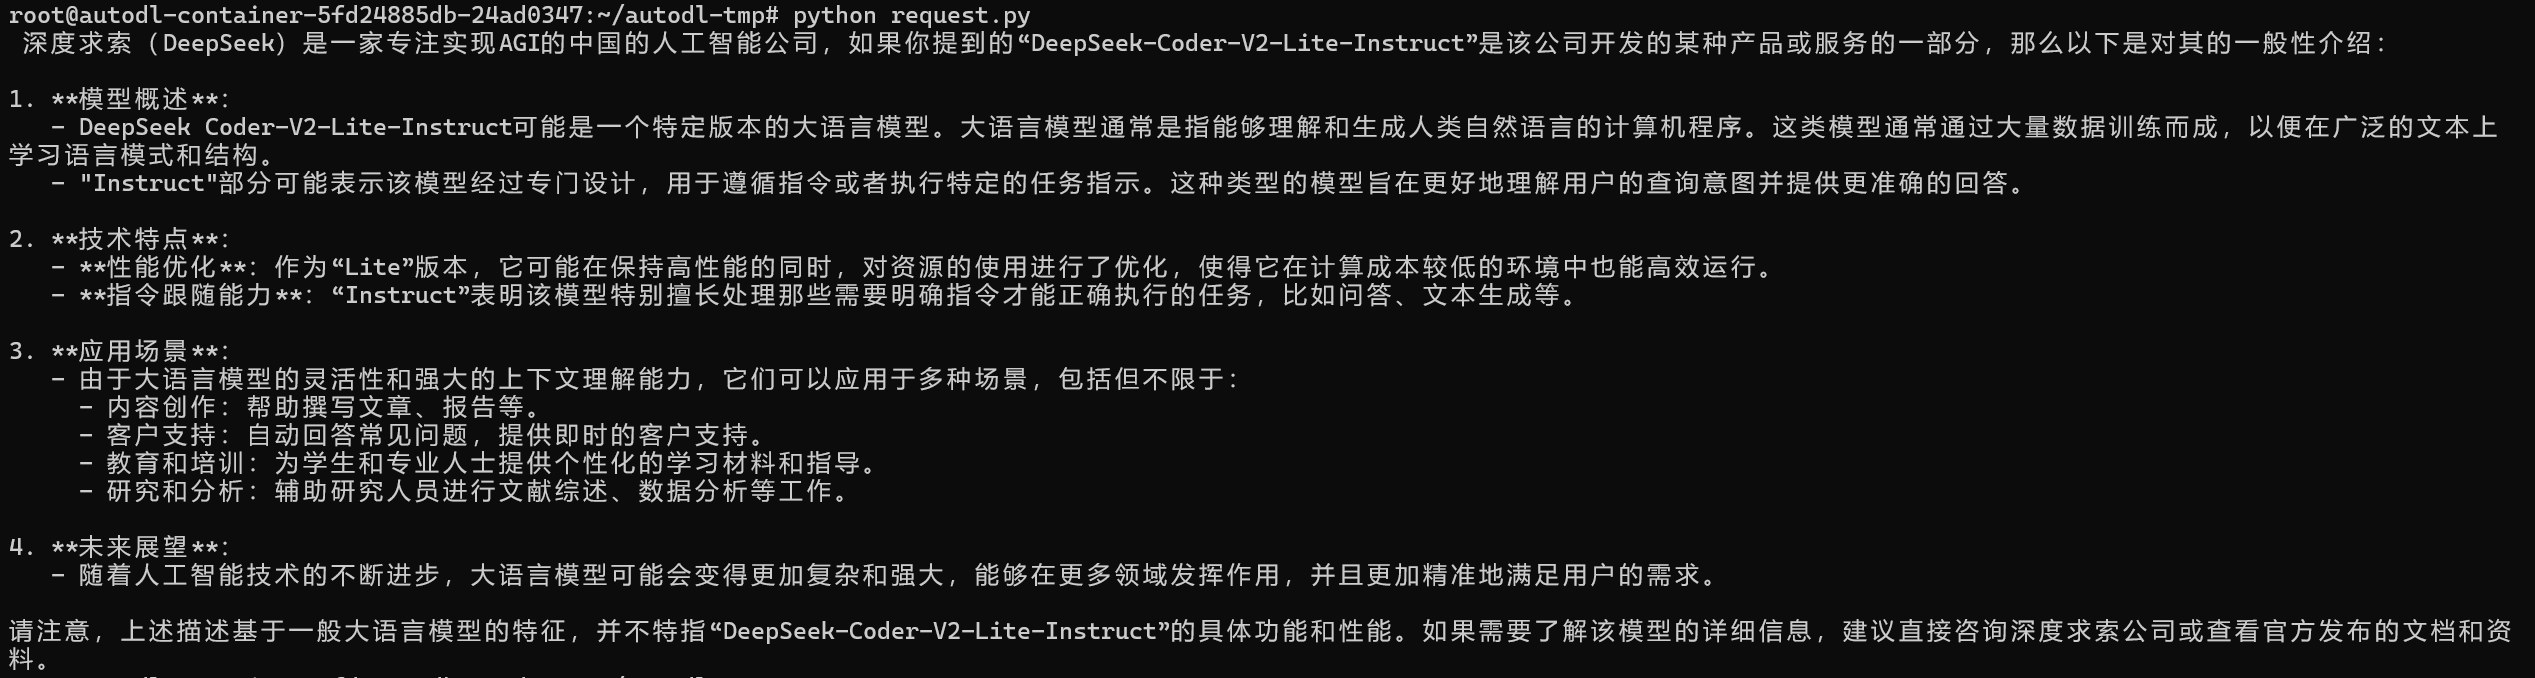
response = requests.post(url='http://127.0.0.1:6006', headers=headers, data=json.dumps(data)) return response.json()['response']if __name__ == '__main__': print(get_completion('你好,帮我介绍一下DeepSeek-Coder-V2-Lite-Instruct大语言模型~'))得到的返回值如下所示:
深度求索(DeepSeek)是一家专注实现AGI的中国的人工智能公司,如果你提到的“DeepSeek-Coder-V2-Lite-Instruct”是该公司开发的某种产品或服务的一部分,那么以下是对其的一般性介绍:

1. **模型概述**:
   - DeepSeek Coder-V2-Lite-Instruct可能是一个特定版本的大语言模型。大语言模型通常是指能够理解和生成人类自然语言的计算机程序。这类模型通常通过大量数据训练而成,以便在广泛的文本上 学习语言模式和结构。
   - "Instruct"部分可能表示该模型经过专门设计,用于遵循指令或者执行特定的任务指示。这种类型的模型旨在更好地理解用户的查询意图并提供更准确的回答。

2. **技术特点**:
   - **性能优化**:作为“Lite”版本,它可能在保持高性能的同时,对资源的使用进行了优化,使得它在计算成本较低的环境中也能高效运行。
   - **指令跟随能力**:“Instruct”表明该模型特别擅长处理那些需要明确指令才能正确执行的任务,比如问答、文本生成等。

3. **应用场景**:
   - 由于大语言模型的灵活性和强大的上下文理解能力,它们可以应用于多种场景,包括但不限于:
     - 内容创作:帮助撰写文章、报告等。
     - 客户支持:自动回答常见问题,提供即时的客户支持。
     - 教育和培训:为学生和专业人士提供个性化的学习材料和指导。
     - 研究和分析:辅助研究人员进行文献综述、数据分析等工作。

4. **未来展望**:
   - 随着人工智能技术的不断进步,大语言模型可能会变得更加复杂和强大,能够在更多领域发挥作用,并且更加精准地满足用户的需求。

请注意,上述描述基于一般大语言模型的特征,并不特指“DeepSeek-Coder-V2-Lite-Instruct”的具体功能和性能。如果需要了解该模型的详细信息,建议直接咨询深度求索公司或查看官方发布的文档和资料。
调用示例结果如下图所示:
DeepSeek-Coder-V2-Lite-Instruct WebDemo 部署
环境准备
本文基础环境如下:
----------------
ubuntu 22.04
python 3.12
cuda 12.1
pytorch 2.3.0
----------------
本文默认学习者已安装好以上 Pytorch(cuda) 环境,如未安装请自行安装。
接下来开始环境配置、模型下载和运行演示 ~
pip 换源加速下载并安装依赖包
# 更换 pypi 源加速库的安装pip config set global.index-url https://pypi.tuna.tsinghua.edu.cn/simple# 升级pippython -m pip install --upgrade pip

pip install modelscope==1.16.1
pip install langchain==0.2.3
pip install streamlit==1.37.0
pip install transformers==4.43.2
pip install accelerate==0.32.1
考虑到部分同学配置环境可能会遇到一些问题,我们在AutoDL平台准备了DeepSeek-Coder-V2-Lite-Instruct的环境镜像,点击下方链接并直接创建Autodl示例即可。 https://www.codewithgpu.com/i/datawhalechina/self-llm/Deepseek-coder-v2
模型下载
使用 modelscope 中的 snapshot_download 函数下载模型,第一个参数为模型名称,参数 cache_dir 为模型的下载路径,参数revision为模型的版本,master代表主分支,为最新版本。
在 /root/autodl-tmp 路径下新建 download.py 文件并在其中输入以下内容,粘贴代码后记得保存文件,如下图所示。并运行 python /root/autodl-tmp/download.py 执行下载,模型大小为 40 GB,下载模型大概需要 20 钟。
import torchfrom modelscope import snapshot_download, AutoModel, AutoTokenizerimport os

model_dir = snapshot_download('deepseek-ai/DeepSeek-Coder-V2-Lite-Instruct', cache_dir='/root/autodl-tmp', revision='master')
终端出现下图结果表示下载成功。

代码准备
在/root/autodl-tmp路径下新建 chatBot.py 文件并在其中输入以下内容,粘贴代码后记得保存文件。下面的代码有很详细的注释,大家如有不理解的地方,欢迎提出issue。

chatBot.py代码如下
# 导入所需的库from transformers import AutoTokenizer, AutoModelForCausalLM, GenerationConfigimport torchimport streamlit as st# 在侧边栏中创建一个标题和一个链接with st.sidebar:
    st.markdown("## Index-1.9B-chat LLM")    "[开源大模型食用指南 self-llm](https://github.com/datawhalechina/self-llm.git)"
    # 创建一个滑块,用于选择最大长度,范围在0到1024之间,默认值为512
    max_length = st.slider("max_length", 0, 1024, 512, step=1)# 创建一个标题和一个副标题st.title("💬 DeepSeek-Coder-V2-Lite-Instruct")
st.caption("🚀 A streamlit chatbot powered by Self-LLM")# 定义模型路径model_name_or_path = '/root/autodl-tmp/deepseek-ai/DeepSeek-Coder-V2-Lite-Instruct'# 定义一个函数,用于获取模型和tokenizer@st.cache_resourcedef get_model():    # 从预训练的模型中获取tokenizer
    tokenizer = AutoTokenizer.from_pretrained(model_name_or_path, use_fast=False, trust_remote_code=True)    # 从预训练的模型中获取模型,并设置模型参数
    model = AutoModelForCausalLM.from_pretrained(model_name_or_path, torch_dtype=torch.bfloat16,  device_map="auto", trust_remote_code=True)
    return tokenizer, model# 加载 DeepSeek-Coder-V2-Lite-Instruct 的model和tokenizertokenizer, model = get_model()# 如果session_state中没有"messages",则创建一个包含默认消息的列表if "messages" not in st.session_state:
    st.session_state["messages"] = [{"role": "assistant", "content": "有什么可以帮您的?"}]# 遍历session_state中的所有消息,并显示在聊天界面上for msg in st.session_state.messages:
    st.chat_message(msg["role"]).write(msg["content"])# 如果用户在聊天输入框中输入了内容,则执行以下操作if prompt := st.chat_input():    # 将用户的输入添加到session_state中的messages列表中
    st.session_state.messages.append({"role": "user", "content": prompt})    # 在聊天界面上显示用户的输入
    st.chat_message("user").write(prompt)
    # 构建输入
    input_ids = tokenizer.apply_chat_template(st.session_state.messages,tokenize=False,add_generation_prompt=True)
    model_inputs = tokenizer([input_ids], return_tensors="pt").to('cuda')
    generated_ids = model.generate(model_inputs.input_ids, max_new_tokens=512)
    generated_ids = [
        output_ids[len(input_ids):] for input_ids, output_ids in zip(model_inputs.input_ids, generated_ids)
    ]
    response = tokenizer.batch_decode(generated_ids, skip_special_tokens=True)[0]    # 将模型的输出添加到session_state中的messages列表中
    st.session_state.messages.append({"role": "assistant", "content": response})    # 在聊天界面上显示模型的输出
    st.chat_message("assistant").write(response)    # print(st.session_state)
运行demo
在终端中运行以下命令,启动streamlit服务
streamlit run /root/autodl-tmp/chatBot.py --server.address 127.0.0.1 --server.port 6006 --server.enableCORS false
点击自定义服务

点击访问 即可看到聊天界面。运行效果如下:
DeepSeek-Coder-V2-Lite-Instruct Lora 微调
导入环境
{'instruction': ['小姐,别的秀女都在求中选,唯有咱们小姐想被撂牌子,菩萨一定记得真真儿的——',

  '这个温太医啊,也是古怪,谁不知太医不得皇命不能为皇族以外的人请脉诊病,他倒好,十天半月便往咱们府里跑。',

  '嬛妹妹,刚刚我去府上请脉,听甄伯母说你来这里进香了。'],

 'input': ['', '', ''],

 'output': ['嘘——都说许愿说破是不灵的。', '你们俩话太多了,我该和温太医要一剂药,好好治治你们。', '出来走走,也是散心。']}
处理数据集
Special tokens have been added in the vocabulary, make sure the associated word embeddings are fine-tuned or trained.
(100001, 100001)
'<|end▁of▁sentence|>'
Map: 0%| | 0/3729 [00:00<?, ? examples/s]
Dataset({

    features: ['input_ids', 'attention_mask', 'labels'],

    num_rows: 3729

})'<|begin▁of▁sentence|>假设你是皇帝身边的女人--甄嬛。nUser: 小姐,别的秀女都在求中选,唯有咱们小姐想被撂牌子,菩萨一定记得真真儿的——nAssistant:嘘——都说许愿说破是不灵的。<|end▁of▁sentence|><|end▁of▁sentence|>'
'你们俩话太多了,我该和温太医要一剂药,好好治治你们。<|end▁of▁sentence|><|end▁of▁sentence|>'
创建模型
Loading checkpoint shards: 0%| | 0/4 [00:00<?, ?it/s]
DeepseekV2ForCausalLM(

  (model): DeepseekV2Model(

    (embed_tokens): Embedding(102400, 2048)

    (layers): ModuleList(

      (0): DeepseekV2DecoderLayer(

        (self_attn): DeepseekV2Attention(

          (q_proj): Linear(in_features=2048, out_features=3072, bias=False)

          (kv_a_proj_with_mqa): Linear(in_features=2048, out_features=576, bias=False)

          (kv_a_layernorm): DeepseekV2RMSNorm()

          (kv_b_proj): Linear(in_features=512, out_features=4096, bias=False)

          (o_proj): Linear(in_features=2048, out_features=2048, bias=False)

          (rotary_emb): DeepseekV2YarnRotaryEmbedding()

        )

        (mlp): DeepseekV2MLP(

          (gate_proj): Linear(in_features=2048, out_features=10944, bias=False)

          (up_proj): Linear(in_features=2048, out_features=10944, bias=False)

          (down_proj): Linear(in_features=10944, out_features=2048, bias=False)

          (act_fn): SiLU()

        )

        (input_layernorm): DeepseekV2RMSNorm()

        (post_attention_layernorm): DeepseekV2RMSNorm()

      )

      (1-26): 26 x DeepseekV2DecoderLayer(

        (self_attn): DeepseekV2Attention(

          (q_proj): Linear(in_features=2048, out_features=3072, bias=False)

          (kv_a_proj_with_mqa): Linear(in_features=2048, out_features=576, bias=False)

          (kv_a_layernorm): DeepseekV2RMSNorm()

          (kv_b_proj): Linear(in_features=512, out_features=4096, bias=False)

          (o_proj): Linear(in_features=2048, out_features=2048, bias=False)

          (rotary_emb): DeepseekV2YarnRotaryEmbedding()

        )

        (mlp): DeepseekV2MoE(

          (experts): ModuleList(

            (0-63): 64 x DeepseekV2MLP(

              (gate_proj): Linear(in_features=2048, out_features=1408, bias=False)

              (up_proj): Linear(in_features=2048, out_features=1408, bias=False)

              (down_proj): Linear(in_features=1408, out_features=2048, bias=False)

              (act_fn): SiLU()

            )

          )

          (gate): MoEGate()

          (shared_experts): DeepseekV2MLP(

            (gate_proj): Linear(in_features=2048, out_features=2816, bias=False)

            (up_proj): Linear(in_features=2048, out_features=2816, bias=False)

            (down_proj): Linear(in_features=2816, out_features=2048, bias=False)

            (act_fn): SiLU()

          )

        )

        (input_layernorm): DeepseekV2RMSNorm()

        (post_attention_layernorm): DeepseekV2RMSNorm()

      )

    )

    (norm): DeepseekV2RMSNorm()

  )

  (lm_head): Linear(in_features=2048, out_features=102400, bias=False)

)
torch.float32
lora
LoraConfig(peft_type=<PeftType.LORA: 'LORA'>, auto_mapping=None, base_model_name_or_path=None, revision=None, task_type=<TaskType.CAUSAL_LM: 'CAUSAL_LM'>, inference_mode=False, r=8, target_modules={'q_proj', 'kv_b_proj', 'o_proj', 'gate_proj', 'up_proj', 'kv_a_proj_with_mqa', 'down_proj'}, lora_alpha=32, lora_dropout=0.1, fan_in_fan_out=False, bias='none', use_rslora=False, modules_to_save=None, init_lora_weights=True, layers_to_transform=None, layers_pattern=None, rank_pattern={}, alpha_pattern={}, megatron_config=None, megatron_core='megatron.core', loftq_config={}, use_dora=False, layer_replication=None)LoraConfig(peft_type=<PeftType.LORA: 'LORA'>, auto_mapping=None, base_model_name_or_path=None, revision=None, task_type=<TaskType.CAUSAL_LM: 'CAUSAL_LM'>, inference_mode=False, r=8, target_modules={'q_proj', 'kv_b_proj', 'o_proj', 'gate_proj', 'up_proj', 'kv_a_proj_with_mqa', 'down_proj'}, lora_alpha=32, lora_dropout=0.1, fan_in_fan_out=False, bias='none', use_rslora=False, modules_to_save=None, init_lora_weights=True, layers_to_transform=None, layers_pattern=None, rank_pattern={}, alpha_pattern={}, megatron_config=None, megatron_core='megatron.core', loftq_config={}, use_dora=False, layer_replication=None)trainable params: 144,918,528 || all params: 15,851,402,752 || trainable%: 0.9142
配置训练参数
`use_cache=True` is incompatible with gradient checkpointing. Setting `use_cache=False`transformers.
/root/miniconda3/lib/python3.10/site-packages/torch/utils/checkpoint.py:429: UserWarning: torch.utils.checkpoint: please pass in use_reentrant=True or use_reentrant=False explicitly. The default value of use_reentrant will be updated to be False in the future. To maintain current behavior, pass use_reentrant=True. It is recommended that you use use_reentrant=False. Refer to docs for more details on the differences between the two variants.
warnings.warn(
| Step | Training Loss |
|---|---|
| 10 | 9.127200 |
| 20 | 8.562900 |
加载 lora 权重推理
Special tokens have been added in the vocabulary, make sure the associated word embeddings are fine-tuned or trained.
Loading checkpoint shards: 0%| | 0/10 [00:00<?, ?it/s]
我是甄嬛,家父是大理寺少卿甄远道。

服务热线: 010-62128818
Email: deepelement.ai@outlook.com
注册会员开通
